
Revolutionizing Warehouse Operations with AtomIQ
Leading Warehouse Distributor Transforms Operations and Achieves Complete Visibility &…

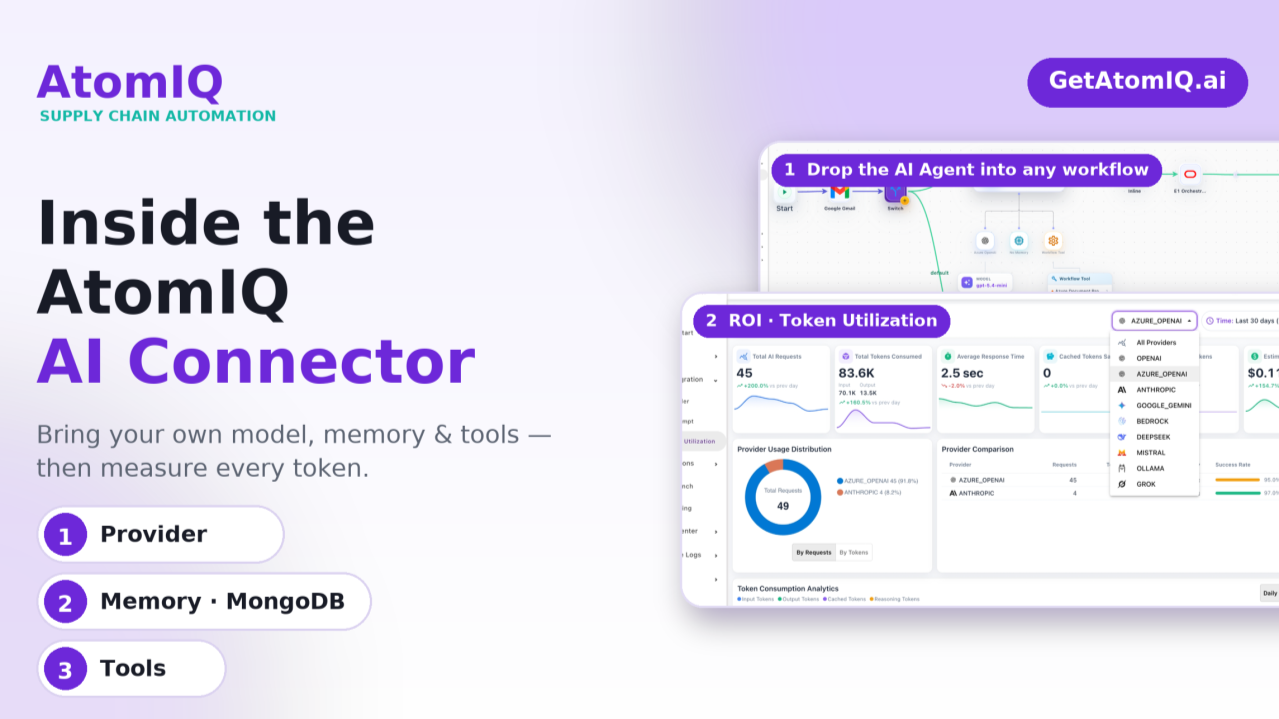
AtomIQ was built on a simple idea: automation should be composable, and AI should be a first-class citizen in every workflow — not a bolt-on. The @AtomIQ AI Connector is how we deliver on that. It lets you drop an intelligent agent into any supply-chain workflow and configure it the same way you configure everything else on the platform — visually, with no code.
Under the hood, the connector is organized into three clear building blocks: Provider (the model), Memory, and Tools. Together they turn a static workflow step into a reasoning agent that can read, decide, and act. Let’s walk through each part — and then look at how the ROI Dashboard keeps every token accountable.
Everything starts with the provider. AtomIQ is deliberately model-agnostic — we don’t lock you into a single vendor. When you add a provider, you pick from a broad library of the leading model families and connect them with your own credentials.
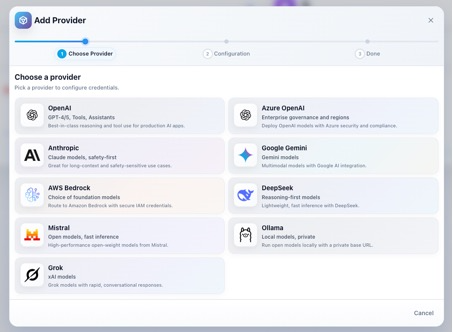
The Add Provider wizard: pick a provider, then configure credentials.
1.1 Select the LLM model — choose from the library, bring your own keys
The provider gallery spans the models teams actually use in production: OpenAI, Azure OpenAI, Anthropic, Google Gemini, AWS Bedrock, DeepSeek, Mistral, Ollama, and Grok. Whether you need best-in-class reasoning, enterprise governance and regional controls, long-context safety, or fully private local inference, there’s a provider for the job.
The key principle is Bring Your Own Keys (BYOK). You supply your own API credentials, so usage runs on your account, under your contracts, and inside your own security and compliance boundaries. That means no markup on tokens, full control over data residency, and the freedom to switch models per workflow.
1.2 Select the prompt
Once a model is connected, you attach a prompt. AtomIQ treats prompts as reusable, versioned assets in the AI Prompt library, so the instructions that define an agent’s behavior are managed centrally rather than buried inside a single workflow. Pick the prompt that matches the task — for example, a “Sales Order Creation” prompt that tells the agent how to read an email and extract order lines.
1.3 Select the output format
Finally, you define how the model should return its answer. Structured output (such as JSON) lets the agent’s response flow directly into the next step of the workflow — an orchestration call, a database write, or an ERP transaction — without brittle text parsing. Choosing the right output format is what turns a chat response into an automation-ready payload.
Smarter AI Workflows, Without the Complexity
Reasoning is far more useful when the agent can remember. The second building block lets you attach memory to the agent. Today, AtomIQ gives you the choice of MongoDB as the memory store — the same document database many teams already run in production.
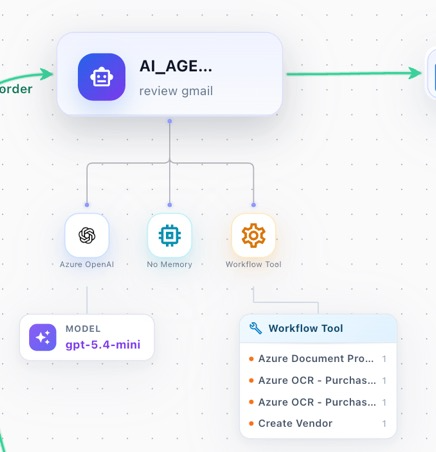
An AI Agent node showing its three attachments: model (provider), memory, and tools.
With MongoDB-backed memory, the agent can persist context across steps and runs — prior messages, extracted entities, intermediate decisions, and state that would otherwise be lost between invocations. Because it’s document-native, it maps naturally to the JSON payloads the agent produces, scales horizontally with your workflow volume, and keeps memory inside your own data estate.
You decide, per agent
Tools are where reasoning becomes action. A model on its own can only produce text; tools give the agent hands. In AtomIQ, each tool triggers an action — either retrieving data the agent needs, or performing an operation in a downstream system.
In the Gmail-to-JDE example, the agent’s Workflow Tools include Azure Document Processing, Azure OCR (purchase documents), and Create Vendor. The agent reviews an incoming Gmail message, uses the OCR / document tools to read the attachment, and then calls the action tools to create the record — before the workflow hands off to inline logic and the JD Edwards (E1) orchestration to complete the sales order.
Provider + Memory + Tools combine into a single AI Agent node that you place anywhere on the canvas. In this example — “Gmail to JDE Sales Order” — the agent sits between a Gmail trigger and the E1 orchestration:
Start → Google Gmail → Switch → AI Agent (Azure OpenAI · gpt-5.4-mini · Workflow Tools) → Inline → E1 Orchestration → End
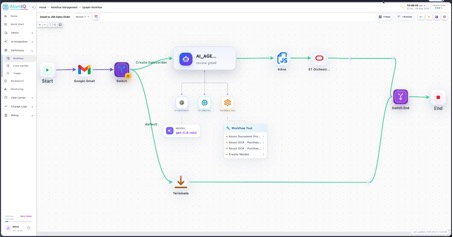
A complete low-code workflow with the AI Agent orchestrating provider, memory, and tools — no code required.
AI is only sustainable if you can see what it costs. The Token Utilization dashboard gives you real-time insight into AI usage across the platform — broken down by provider and by workflow.
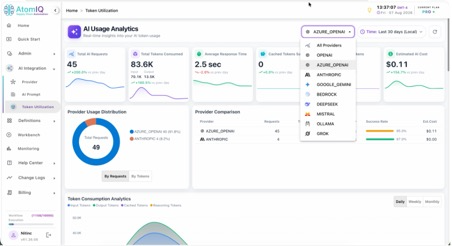
At a glance you get Total AI Requests, Total Tokens Consumed (input vs output), Average Response Time, Cached Tokens Saved, Reasoning Tokens, and Estimated AI Cost — each with day-over-day trends.
Because you’re on BYOK, these numbers reflect your real consumption on your own keys — so finance sees true cost, and engineering sees where to optimize.
The AtomIQ AI Connector distills enterprise AI into three decisions — which model, what it remembers, and what it can do — and then makes every token accountable. Bring your own keys, keep your data in your own estate, and measure the ROI of every workflow. That’s AI you can actually put into production.
AI-Powered Supply Chains, Made Simpler

Leading Warehouse Distributor Transforms Operations and Achieves Complete Visibility &…

Leading Apparel Manufacturer Digitizes Warehouse Operations with Powerful Integration of…

Global Multi-Facility Manufacturer Launches Cycle Count Apps to Streamline Inventory…

Leading Global Manufacturer Empowers Field Users for Efficient Order Management…

Global Automotive Manufacturer Launches PO Approval Apps for 200+ Users

Leading Commercial Beverage Systems Manufacturer Digitizes Shopfloor Management to Overcome…

Leading Industrial Equipment Manufacturer Enhances Work Order Scheduling in E1

Learn how leading companies are automating and simplifying expense management…

Leading global manufacturer of home building products rolls out warehouse…

Leading global manufacturer integrates with their third-party freight provider to charges in real-time.